

Table of Contents
- What Pen Turning Actually Involves
- Essential Pen Turning Tools for Beginners
- Budget Setup vs. Premium Setup: What Do Beginners Really Need?
- Pen Turning Safety Tips for Beginners
- Understanding Pen Kits and Bushings Compatibility
- Diagnosing Loose and Tight Fits in Pen Turning
- How to Learn Pen Turning in One Day
- Finishing Techniques for Wooden Pens
- Choosing Pen Blanks: Wood, Acrylic, and Sustainable Options
- Frequently Asked Questions
Last Updated: October 12, 2026
What Pen Turning Actually Involves
Have you ever wondered how a simple piece of wood becomes a beautiful, handcrafted writing pen?
Pen turning is a woodworking technique that uses a lathe to shape small pieces of wood into smooth, rounded pen barrels. Once the wood is shaped, sanded, and finished, the barrels are assembled with metal components to create a functional, one-of-a-kind writing instrument.
One of the wonderful things about pen turning is that you don't need years of woodworking experience to get started. With the right tools, safety instruction, and a little guidance, even a complete beginner can create a beautiful pen.
At Artists of Elements in St. Petersburg, Florida, our hands-on Pen Turning Workshop introduces beginners to the process of making their own wooden pen. You'll learn how to use a wood lathe, shape and sand your pen, and assemble the finished pieces.
Best of all, you'll leave with a handcrafted pen you made yourself.
Whether you're exploring a new hobby, looking for a creative experience, or interested in making personalized gifts, pen turning is a rewarding place to begin.
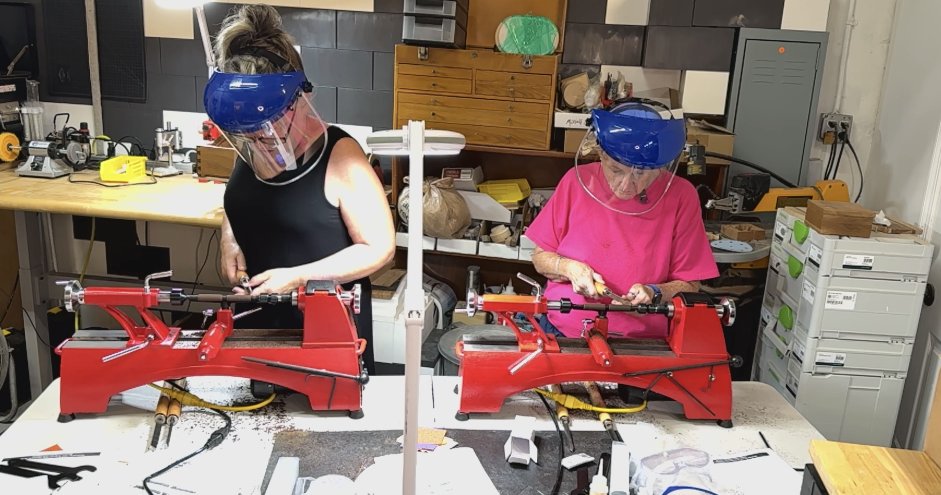
Most people finish their first pen in an afternoon.
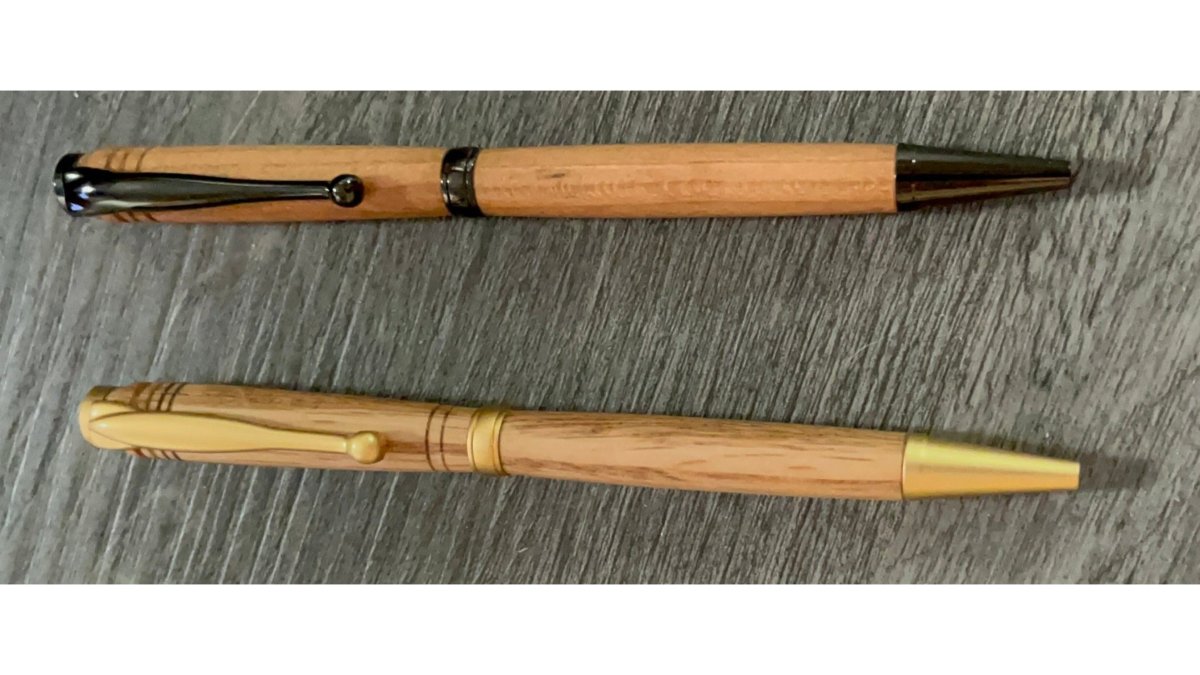
Pen Turning Workshop - Craft Your Own Custom Pen
Essential Pen Turning Tools for Beginners
Getting started with pen turning doesn't require a large woodworking shop, but there are a few essential tools and supplies you'll need.
Wood Lathe: The main tool used to shape the wooden pen blanks. A small benchtop lathe is an excellent choice for beginners.
Pen Mandrel: A metal shaft that holds the prepared pen blanks and bushings securely in position while turning.
Pen Bushings: Small metal guides that help you shape the wooden barrels to match the diameter of the pen's metal components.
Turning Tools: Sharp woodturning tools are used to gradually remove material and shape the pen barrels.
Sandpaper and Finishing Supplies: These help smooth the wood and bring out its natural color and grain.
Pen Kit: Contains the metal components needed to assemble a functional writing pen, including the brass tubes, mechanism, refill, and decorative hardware.
Pen Press: Used to carefully assemble the finished wooden barrels with the metal pen components.
Do You Need to Buy All These Tools?
Not necessarily!
At Artists of Elements in St. Petersburg, Florida, our beginner pen turning workshop provides the equipment, materials, and instruction needed to create your first handcrafted pen.
We use prepared Wenge wood blanks and gold Slimline pen kits, allowing beginners to focus on learning how to operate the lathe, shape the wood, sand, finish, and assemble their pen.
It's a great way to experience woodturning before deciding whether to invest in your own equipment.
Budget Setup vs. Premium Setup: What Do Beginners Really Need?
One of the first questions new woodturners ask is, "How much does it cost to start turning pens?"
The answer depends on whether you want to try pen turning as a new hobby or invest in equipment for your own workshop.
The good news is that you don't have to purchase expensive equipment to experience the satisfaction of making your first handcrafted pen.
Comparing Your Options
Option |
What You'll Need |
Best For |
|---|---|---|
Beginner Workshop |
Tools, materials, and instruction provided |
Trying pen turning before buying equipment |
Budget Home Setup |
Small benchtop lathe, mandrel, bushings, turning tools, drilling equipment, sharpening supplies, and safety equipment |
Beginners ready to practice at home |
Premium Home Setup |
Quality variable-speed lathe, upgraded turning tools, sharpening system, drill press, dust collection, and specialized accessories |
Hobbyists planning to turn pens regularly |
Starting With a Budget Setup
A small benchtop lathe is often sufficient for turning pens. You don't need a large, expensive machine to create beautiful writing instruments.
However, remember that the lathe is only part of the investment. You'll also need turning tools, a pen mandrel, bushings, drilling equipment, sanding supplies, finishing products, and appropriate safety equipment.
One area where you shouldn't cut corners is tool maintenance. Sharp, properly maintained turning tools are essential for clean cuts and safe operation.
Is a Premium Setup Worth the Investment?
If you discover that you love pen turning and want to make pens regularly, upgrading your equipment may be worthwhile.
A quality variable-speed lathe, reliable sharpening system, and precision accessories can improve consistency and make the turning process more enjoyable.
But expensive equipment doesn't automatically produce better pens. Good technique, patience, and practice matter much more.
Try Pen Turning Before Investing in Equipment
If you're curious about pen turning but aren't ready to purchase a lathe, taking a beginner workshop is an excellent place to start.
At Artists of Elements in St. Petersburg, Florida, our beginner pen turning experience provides the tools, materials, and hands-on instruction needed to create your first wooden pen.
You'll learn the basics of operating a wood lathe, shaping and sanding Wenge wood, applying Aussie Friction Polish, and assembling your finished pen with gold Slimline components.
Pen Turning Safety Tips for Beginners
Safety is one of the most important parts of learning to turn a pen. A wood lathe is a powerful tool, and understanding how to operate it properly helps make woodturning a safe and enjoyable experience.
Before beginning any pen turning project, follow these essential safety practices.
1. Always Wear Eye Protection
Wear ANSI-rated safety glasses and use a full-face shield when appropriate. Even small pieces of wood can release chips or fragments while turning.
2. Secure Long Hair and Loose Clothing
Tie back long hair, remove dangling jewelry, and avoid loose sleeves or clothing that could become caught in the rotating lathe. Never wear loose gloves while operating a lathe.
3. Check Your Equipment Before Starting
Make sure the pen mandrel, bushings, and blanks are properly secured. Remove the chuck key or other adjustment tools before starting the lathe.
4. Start at an Appropriate Lathe Speed
Begin at a low speed to check that the workpiece runs smoothly and securely. Adjust the speed according to the lathe manufacturer's recommendations, the material, and the turning operation.
5. Keep Your Turning Tools Sharp
Sharp tools produce cleaner cuts and require less pressure. Always position the tool rest correctly and keep your tools properly supported while cutting.
6. Protect Yourself From Wood Dust
Wood dust can irritate your lungs and eyes. Use appropriate dust collection and respiratory protection, especially when sanding.
7. Use Finishing Products Safely
Finishing products require special care. Follow the manufacturer's instructions, provide adequate ventilation, and keep finishing materials away from ignition sources.
Never wrap polishing cloths around your fingers or hands while working near a rotating lathe. Loose materials can become caught in moving equipment.
8. Stop the Lathe Before Making Adjustments
Always turn off the lathe and wait for it to stop completely before adjusting the tool rest, checking measurements, or repositioning the workpiece.
Learning in a Supervised Workshop
At Artists of Elements, safety instruction is part of our beginner pen turning experience.
Students learn how to operate the lathe, handle turning tools, and work through each stage of creating their own wooden pen under instructor supervision.
Learning proper techniques from the beginning helps build confidence and good woodworking habits.
Watch OutA common mistake is sanding without eye protection because "it's just dust." A spinning blank can throw grit and CA glue fragments. Put the glasses on before the lathe starts, not after.
Understanding Pen Kits and Bushings Compatibility
When making a handcrafted pen, choosing the correct pen kit and bushings is just as important as selecting the wood.
A pen kit contains the components needed to turn your finished wooden barrels into a working writing instrument.
Depending on the pen style, a kit may include brass tubes, a writing mechanism, an ink refill, a pen tip, a clip, and decorative metal components.
What Is a Slimline Pen Kit?
Slimline pens are among the most popular choices for beginning woodturners.
Their simple design, comfortable size, and relatively straightforward assembly make them an excellent introduction to pen turning.
A standard Slimline pen kit typically includes two brass tubes of equal length, along with the metal components needed to assemble the pen.
At Artists of Elements, our beginner pen turning workshop uses gold Slimline pen kits paired with Wenge wood blanks.
What Are Pen Bushings?
Pen bushings are small metal guides that fit onto the pen mandrel alongside the wooden blanks.
They help the woodturner shape each barrel to the correct diameter so the finished wood fits smoothly against the pen's metal components.
Different pen kits may require different bushings, even when they use similar-sized brass tubes.
Why Compatibility Matters
Before beginning a pen turning project, always check that your pen kit, drill bit, brass tubes, and bushings are compatible.
Using incorrect bushings can result in wooden barrels that are too large or too small for the pen hardware.
Always follow the specifications provided by the pen kit manufacturer rather than assuming that different kits use interchangeable parts.
A Beginner-Friendly Approach
In our beginner pen turning workshop, the Wenge wood blanks are already drilled and prepared before students begin.
This allows participants to concentrate on learning the turning process without worrying about selecting drill bits or preparing brass tubes.
Students focus on shaping their wooden barrels, sanding, applying Aussie Friction Polish, and assembling their finished gold Slimline pen.
It's a practical introduction to the art of pen turning without overwhelming beginners with unnecessary technical details.
Common Pen Kits for Beginners
Pen Style |
Skill Level |
What Makes It Different |
|---|---|---|
Slimline |
Beginner |
Two wooden barrels, slim design, simple assembly |
Comfort |
Beginner |
Similar to Slimline, with a wider grip |
Gatsby / Sierra |
Beginner–Intermediate |
Single wooden barrel, larger diameter |
Cigar |
Intermediate |
Two thicker barrels, more substantial design |
Bolt Action |
Intermediate |
Distinctive bolt-style mechanism |
Beginner Tip: Every pen kit has specific requirements for drill bits, brass tubes, and bushings. Always follow the manufacturer's instructions to ensure the parts fit correctly.
For your first pen, a Slimline kit is an excellent choice. Its straightforward design makes it easier to concentrate on learning basic turning techniques.
Diagnosing Loose and Tight Fits in Pen Turning
One of the most important parts of making a handcrafted pen is ensuring that the wooden barrels fit properly with the metal components.
Even a beautifully turned pen can be difficult to assemble if the barrels aren't sized correctly.
Here are a few common problems beginners may encounter.
1. The Wooden Barrel Is Too Small
If the outside diameter of the wooden barrel is smaller than the pen's metal components, the finished pen may have an uneven appearance.
This usually happens when too much wood is removed during turning or sanding.
How to avoid it: Use the correct bushings as a guide, take light cuts, and check your progress frequently. Remember that sanding also removes material.
2. The Wooden Barrel Is Too Large
If the barrel is larger than the adjoining metal components, the finished pen may have noticeable ridges where the wood meets the hardware.
How to fix it: Before assembly, carefully remove a small amount of additional material through controlled turning or sanding. Check the fit frequently to avoid removing too much wood.
3. The Pen Components Won't Press Into the Brass Tubes
Sometimes glue or debris remains inside the brass tubes after the blanks are prepared.
This can prevent the metal components from fitting correctly.
How to fix it: Inspect the tubes before assembly. Carefully remove any obstruction using an appropriate tube-cleaning tool without damaging or enlarging the brass tubes.
Never force the pen components into place. Excessive pressure can split the wood or damage the pen mechanism.
4. The Wrong Bushings Were Used
Different pen styles require specific bushings to achieve the correct barrel dimensions.
Using the wrong bushings can cause an uneven fit between the wooden barrels and metal components.
How to avoid it: Always verify that your bushings match the pen kit manufacturer's specifications.
Learning Proper Fit and Assembly
In our beginner pen turning workshop at Artists of Elements, students learn to shape their Wenge wood barrels using bushings as guides.
Once the barrels are shaped, sanded, and finished with Aussie Friction Polish, students assemble their gold Slimline pens.
With careful instruction and attention to detail, beginners can create a smooth, attractive pen they'll be proud to use or give as a gift.
Pro TipBuy the bushing set and the drill bit at the same time as the kit, from the same vendor, and write the kit name on the bushing bag with a permanent marker. Bushing bags from different kits look identical in a drawer, and mixing them up is the most common cause of a barrel that will not match its hardware.
Bushings Are Not the Only Option
While pen mandrels and bushings are commonly used by beginners, experienced woodturners sometimes use a technique called turning between centers.
This method allows turners to shape individual pen barrels using precision measuring tools rather than relying entirely on bushings.
For beginners, however, a pen mandrel with the correct bushings is a practical and straightforward way to learn.
As your skills improve, you can explore other turning methods and techniques.
How to Learn Pen Turning in One Day
You don't need years of woodworking experience to make your first handcrafted pen. With proper instruction, the right equipment, and a little patience, beginners can learn the basics of pen turning in just one afternoon.
At Artists of Elements in St. Petersburg, Florida, our beginner pen turning workshop takes approximately 2½ to 3 hours. Students work with prepared Wenge wood blanks and gold Slimline pen kits.
A Step-by-Step Guide to Making Your First Pen
Step 1: Learn Lathe Safety
Before beginning, you'll learn the essential safety procedures, how the lathe operates, and how to handle turning tools properly.
Step 2: Prepare the Pen Mandrel
The prepared Wenge wood blanks are positioned on the pen mandrel with the appropriate bushings.
Step 3: Begin Shaping the Wood
Using woodturning tools, you'll gradually remove material from the spinning blanks, transforming the square wood into rounded pen barrels.
Step 4: Refine Your Pen's Shape
As you approach the finished dimensions, you'll take lighter cuts and use the bushings as guides to achieve a smooth, balanced shape.
Step 5: Sand the Wooden Barrels
You'll work through progressively finer sandpaper grits to remove tool marks and prepare the wood for finishing.
Step 6: Apply Aussie Friction Polish
You'll learn how to apply Aussie Friction Polish according to the manufacturer's instructions, bringing out the natural beauty and rich color of the Wenge wood.
Step 7: Remove and Inspect the Barrels
Once the finishing process is complete and the lathe has stopped, you'll remove the wooden barrels and check their appearance and fit.
Step 8: Assemble Your Pen
Using a pen press and the gold Slimline components, you'll carefully assemble your finished pen.
Step 9: Enjoy Your Handcrafted Creation
The final result is a beautiful, functional writing pen that you created yourself!
What Will You Take Home?
At the end of the workshop, you'll leave with your own handcrafted Wenge wood pen and the satisfaction of learning a new woodworking skill.
Whether you keep your pen or give it as a thoughtful handmade gift, you'll have created something truly unique.
Pro TipWhen shaping your first pen, use light, controlled cuts and check your progress frequently. It's always easier to remove a little more wood than to fix a barrel that's been turned too small. As you approach the bushings, slow down, refine your cuts, and remember that sanding will remove additional material. Patience is the key to a beautifully finished pen.
Finishing Techniques for Wooden Pens
The finishing process is one of the most rewarding parts of pen turning. It's when the natural beauty of the wood really begins to shine.
A good finish enhances the wood grain, creates a smooth surface, and helps protect the pen from everyday handling.
There are several finishing techniques available, each offering a different appearance and level of protection.
Sanding: The Foundation of a Beautiful Finish
Before applying any finish, the wooden pen barrels must be properly sanded.
Start with an appropriate sandpaper grit to remove tool marks, then gradually work through finer grits until the surface feels smooth.
Take your time during this step. Scratches left behind during sanding may become more noticeable after the finish is applied.
Aussie Friction Polish: A Great Beginner Finish
Aussie Friction Polish is the finish we use in our beginner pen turning workshops at Artists of Elements.
This polishing product helps enhance the natural color and grain of the wood while creating a smooth, attractive sheen.
Students learn how to apply the polish according to the manufacturer's instructions, with attention to safe handling around the lathe.
Friction polish is especially appealing for beginners because it allows them to see the transformation from freshly turned wood to a beautifully polished pen during a single workshop.
Although friction polish may require occasional maintenance with regular use, it provides an attractive finish that showcases the natural character of the wood.
CA Glue Finish: A Durable Alternative
CA glue, also known as cyanoacrylate, is another popular finishing option among pen turners.
When applied correctly, it creates a hard, glossy protective coating that can withstand frequent handling.
However, CA finishing requires additional techniques, appropriate ventilation, protective equipment, and careful attention to the manufacturer's safety instructions.
It's a technique beginners may wish to explore as their woodturning skills develop.
Resin and Acrylic Pens
Resin and acrylic pen blanks offer a different appearance from natural wood.
These materials are available in a wide variety of colors and patterns and can be polished to a brilliant shine.
Turning and polishing resin or acrylic blanks may require different techniques and abrasives than working with wood.
For beginners, starting with a wooden pen is an excellent way to develop basic turning skills before experimenting with other materials.
Choosing the Right Finish
Finish |
Appearance |
Best For |
|---|---|---|
Aussie Friction Polish |
Natural-looking sheen |
Beginner wooden pens |
CA Glue |
Glossy, protective coating |
Frequently used wooden pens |
Polished Acrylic or Resin |
Smooth, high-gloss surface |
Acrylic and resin pen blanks |
The best finish depends on the material, how the pen will be used, and the appearance you want to achieve.
For our beginner workshop, we love how Aussie Friction Polish brings out the rich, dark grain of Wenge wood while allowing students to experience the finishing process firsthand.
Pro TipThe finish decides how the pen feels in the hand and how long it lasts. A pen sanded to 400 grit and polished properly feels like silk. A rushed finish feels like sandpaper, no matter how good the turning was. Match the finish to how the pen will actually be used, not to how it looks in a photo.
Choosing Pen Blanks: Wood, Acrylic, and Sustainable Options
One of the most enjoyable parts of pen turning is choosing the material for your pen. Every piece of wood has its own grain, color, and character, making each finished pen unique.
Pen blanks are small pieces of material prepared for turning on a lathe. They can be made from natural wood, acrylic, resin, or combinations of different materials.
Wood Pen Blanks: A Natural Starting Point
Wood is a popular choice for beginning pen turners because of its natural beauty and the variety of species available.
Some popular woods for pen turning include:
- Wenge: A dark, richly grained hardwood with a distinctive appearance.
- Walnut: A beautiful brown hardwood with warm tones and attractive grain patterns.
- Maple: A lighter-colored hardwood that can produce a smooth, elegant pen.
- Cherry: A warm-toned wood that develops a richer color over time.
- Purpleheart: A hardwood known for its striking purple coloration.
Each species behaves differently on the lathe. Some are easier to shape, while others require extra care to avoid splintering or tear-out.
Why We Use Wenge in Our Beginner Workshop
At Artists of Elements, our beginner pen turning students work with prepared Wenge wood blanks.
Wenge has a distinctive dark color and striking grain that creates an attractive contrast with the gold Slimline pen components.
Because Wenge can splinter and produce irritating dust, proper tool technique, eye protection, dust collection, and appropriate respiratory protection are especially important.
With careful instruction, students learn to shape and sand their Wenge pen barrels before applying Aussie Friction Polish to enhance the wood's natural appearance.
Acrylic and Resin Pen Blanks
Acrylic and resin blanks offer exciting possibilities for pen turners interested in bright colors, swirling patterns, and decorative effects.
Unlike natural wood, these materials can produce vivid colors and designs that aren't found in nature.
They also require different turning and polishing techniques, making them interesting materials to explore as your skills develop.
Sustainable Wood Choices
Pen turning is also a wonderful way to make use of smaller pieces of wood that might otherwise go to waste.
Woodworkers can create beautiful pens from furniture-making offcuts, responsibly sourced lumber, and suitable reclaimed wood.
Even a small piece of wood can become a useful, handcrafted writing instrument.
Every Pen Has Its Own Character
Whether you choose the rich, dark grain of Wenge, the warmth of walnut, or the vibrant colors of acrylic, every pen blank offers an opportunity to create something unique.
As you gain experience, experimenting with different materials is one of the most enjoyable ways to develop your own pen turning style.

Pen turning rewards patience more than talent. The first pen is rarely perfect, and that's fine. The tenth one usually is.
If you'd rather learn with someone guiding you, our Pen Turning Workshop - Craft Your Own Custom Pen walks you through every step with all materials and tools provided. Browse our workshops and start shopping for the handmade pieces our makers create every month.
Frequently Asked Questions
Is pen turning difficult for beginners?
Not at all! Pen turning is a great introduction to woodturning. With proper instruction, patience, and a little practice, even someone who has never used a wood lathe can create a beautiful, functional writing pen.
Do I need woodworking experience to take a pen turning workshop?
No previous woodworking experience is necessary. Our beginner pen turning workshop at Artists of Elements is designed for people who are completely new to woodturning. You'll receive hands-on instruction throughout the process.
How long does it take to make a wooden pen?
Most beginners can complete their first wooden pen in approximately 2½ to 3 hours during a guided workshop. This includes learning lathe safety, shaping the wood, sanding, finishing, and assembling the pen.
What tools do I need to start pen turning?
Basic pen turning equipment includes a wood lathe, pen mandrel, bushings, turning tools, drilling equipment, sanding supplies, finishing products, and a pen press. You'll also need appropriate safety equipment. If you attend a beginner workshop at Artists of Elements, the necessary tools and materials are provided.
What kind of wood is best for a beginner pen?
Several hardwoods are suitable for pen turning, including maple, cherry, and walnut. At Artists of Elements, we use prepared Wenge wood blanks for our beginner workshop. Wenge produces a beautiful dark pen with distinctive grain, although it requires careful turning and dust protection.
What finish is used on handmade wooden pens?
Wooden pens can be finished with friction polish, CA glue, or other wood-finishing products. In our beginner workshop, students use Aussie Friction Polish to enhance the natural appearance of their Wenge pens.
Can I make a pen in one workshop?
Yes! Our beginner pen turning workshop guides you through the process of creating your own wooden pen, from shaping the prepared blanks to assembling the finished pen. You'll leave with a functional, handcrafted writing instrument you made yourself.
Where can I take a beginner pen turning class in St. Petersburg, Florida?
Artists of Elements offers hands-on beginner pen turning workshops in St. Petersburg, Florida. Our workshops provide the equipment, materials, and instruction needed to experience woodturning in a welcoming, beginner-friendly environment. Visit Artists of Elements to explore our upcoming workshops and discover the satisfaction of creating something with your own hands.